Google Analytics

Showing posts with label baby clothes quilt. Show all posts

Thursday, September 17, 2015

Vintage Baby Clothes


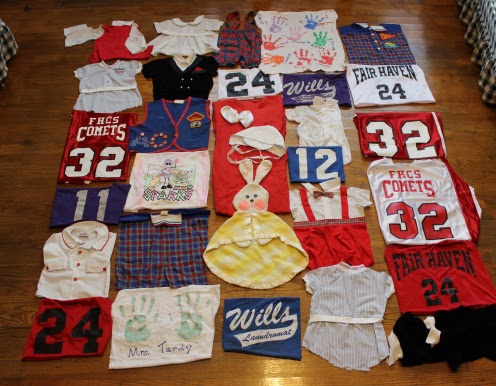
My cousin's son is in his 30s? now, and this quilt contains pieces from newborn to adult.  
 Here are all of the pieces on the floor.  Ready for graphing.    There are little baby Christmas outfits, jerseys, signed and painted T-shirts, boy scout vest, soft toys, booties, and bonnet.  
 Here is the quilt top pieced.   Since I couldn't adequately baste the quilt with the 3D elements, I added those later after the quilting.   
 Finished quilt with extra elements quilted/tacked down.   


 The back is a grey chevron.  
 

To order your own clothing quilt, send me a message on facebook or email with the subject line "Quilt"  


KatiesQuiltsAndCrafts@gmail.com
Facebook.com/KatiesQuiltsAndCrafts 


Monday, January 5, 2015

New Baby Clothes Quilt!


 This might be my favorite baby clothes quilt yet!   Just look at all of the details and fun stuff that is included.  There are 3D elements such as butterflies with moveable wings.  There are several bibs that seem to jump off the quilt, and even a santa hat.  The Disney costumes/dresses/tutus were cut using the skirts left full. So that the skirt area could flow freely or be moved by your hand.
I added a soft little bootie, kept all of the buttons and original areas that I possibly could, There's even a HAIRBOW.  And to top it all off, I embroidered the name in the center with a pretty curly font!

a photo of the completed quilt TOP 

. . . andddd the finished quilt! 
 a peek at the back!


If you would like to order your own custom T-quilt made of baby clothes.  Please email me at KatiesQuiltsAndCrafts@gmail.com

Here is my price list 

Here is the photo album that contains all of my previous T-quilts.  


Friday, February 7, 2014

Grace's Quilt

**To order your own custom baby clothes quilt - please go to my facebook page for pricing and info**


This quilt is made up of the clothing worn in the first couple years of Grace's life.  Her mom Melanie and I went to school together and we sang in Show Choir together.   
This is the 2nd quilt made of baby clothes I have ever made. The FIRST one, (Brady's Baby Quilt) was made entirely of BOYS clothing and blankets.  The boys clothing was a bit easier, since it didn't have as many small parts ;c) I wanted to conserve as many as the little logos and embellishments from these clothes as I could. This meant that I had to take the seam ripper and remove stuff, and then REapply it on the block before sewing it into the quilt.  
I still enjoyed every minute of this quilt!!  T-shirt quilts are my favorite because they are like a puzzle.  So when I get a chance to make these quilts out of baby clothes, the puzzle pieces are SMALLER, and more challenging/FUN.

 This is sort my screwed-up process of making a quilt.  First, I lay all of the pieces down, folded, as they would appear in the quilt.  Then I go in with a ruler and graph them out on graph paper and label each block.
 this is all the pieces, fused and cut, and the graph paper. . ready for the machine!!!
 finished TOP!
 Pretty zig-zag backing!
 awww, little quilt bundle of happiness!!!  
 Finished quilt - on a sunny, albeit very muddy, cold day ;c) 


Monday, August 27, 2012

Brady's Baby Clothing Quilt & Sammy's Baby Quilt

I can make your own custom baby clothes quilt-
**See my facebook page for ordering and pricing information**

Two finished for the last few weeks.  I wanted to share them both with you guys here.
First, I finally got the opportunity to make a quilt out of baby clothes!  There was a mixture of knits, wovens, and fleece.   AND, since the clothes were so small, it was especially difficult to capture the WHOLE shirt logo without cutting into the arm seams.   BUT, we did it, and I think it turned out awesome!

 That's MOM (Beth) on the left, with her son Brady. . and that's me on the right.  We're in Jacqueline's back yard.. .she is Brady's grandmother (Beth's Mom.)  Her back yard is perfect for photos!!
Here's a photo of the back of the quilt, I used leftover woven fabric from Brady's little dress shirts, on the back.  Strip pieced them, and then added them in between two layers of Xtra wide quilt fabric!
And I just wanted to share with you my graph for this quilt.  As I've said before, every SINGLE quilt, for me, starts with a graph.  Graphing out my quilts is especially important for T-shirt quilts. I measure each block, then write in a brief (and I mean REALLLLY brief) description of each shirt inside the block.   Since we were doing BABY shirts, these blocks were especially SMALL. . making it especially CHALLENGING!   I thought this graph was really funny, and I'm glad noone else has to decipher it but me! LOL


My next quilt was a quilt for our church choir director Jack.  He recently had a baby boy and named him Sammy.   He told me to make whatever quilt I wanted, but gave me these specs:   Colors- blue and brown, Theme: Traditional.   When he told me this, I immediately thought:  SCRAPPY!!!   So, I went to the trusted QUILTVILLE site to look for a fun pattern to use for scraps.   I have always been drawn to her PLAYING WITH JACKS pattern, and so it was.

 I pulled out my 2.5" strips of Browns, Neutrals, and Blues.
 Here are all of my "jacks on six" or "double x" blocks finished and pressed!  They don't look like much now do they?  haha
 Here is the completed center top
 Top complete with borders!
 I REALLLLLY had fun quilting this quilt!!  I just love quilting patchwork !   And surprisingly, I don't get to do it very often!
 I stippled in all the neutral areas so that the "Xs" would POP!  Then I went in and did a one-line outline quilt all around the rest of the patches.
 I fused Sammy's initials onto the back of the quilt.   I did this after I made the sandwich, and just quilted over them!
 I tried something different with the feathers this time around - I quilted my feathers, and then did an echo stitch back down to the starting point.  I really REALLY like the way it looks, and plus, it's easier!  YOu don't have to either make a stop, and then reposition, OR follow your feather vein all the way back down!
 I really like this photo of the quilt - it shows off the quilting AND the back.
 Thank you hubby for helping me photograph (it's like pulling teeth God-love him!)
 We got a little bit of sunshine on the quilt, showing off the feathers!