Google Analytics

Thursday, December 17, 2015

Necktie Memory Quilts

My friend John commissioned this quilt - we went to church camp together when we were wee little kids.   The ties were his grandfathers and he wanted two quilts made from them.   I happily accepted because this quilt has been on my bucket list for a long time.  


I really enjoyed making these quilts.  
I did not make these the "normal" way.  I wanted to keep the original width and original points of the ties.  I just cut off the excess and stitched them down to a background fabric.  First I arranged them all on the background, and then pinned them all down, cutting away any excess.
   I do NOT recommend this method, but if for some crazy reason you try it yourself, I recommend that you use glue.  On the 2nd quilt, I realized that pins shifted way too much, so I just used a little glue stick on each of the ties in between the pins, and it made it 1000x better!


So here you can see my ties pinned to the background, and then after they were all stitched down, I cut away the excess fabric.   Kinda cool looking though, right?
In the end, it all worked out beautifully though.  


Below you can see the 3 stages of my corner fans.  I started by sketching the fan shape onto freezer paper.  I ironed the freezer paper to the quilt, and then quilted the outline.   I removed the paper, and for the center lines, I just took the dull side of a butter knife and gently pressed against my ruler so that I had my quilt guidelines.  I don't know how this quilt will be laundered so I didn't want to use any type of marking utensil, even chalk!   


 The back of the quilt is a print of blue birds.   John's grandfather loved birds, and also the color blue.

 I think this is my favorite photo of the quilt - I love this closeup 
 A few other closeup shots. 

 This is the first quilt, it's a few inches smaller and the stippling in the background was much more dense.  
 This is the second quilt I made, it's a few inches bigger, and I had to make the circle bigger in the center to accomodate the ties.   And since the whole quilt was bigger, I also made the corner fans a bit larger too.   I also thought the stippling done inthe first quilt was a hair TOO dense, so I made this one a little more open - I think it more appropriately matches the quilting in the ties and the fans.
 My run-down old fence -  I hope I can hang many more quilts on it.  ;c)


Thursday, November 5, 2015

Wedding Signature Quilt


 The Cabell's decided to have their guests sign fabric instead of a guest book. 
 I am honored that they chose me to make their wedding quilt!   


 For the quilting in the white open areas, I chose a version of paisleys but with hearts.  
 Here is the quilt after all the quilting is finished, before binding

 And what an absolutely PERFECT day (and time) for photographing this quilt!   Right before sunset!
 I added some FF Triangles to the back of the quilt for hanging.   I feel like the triangles don't add the bulk like a sleeve does.   But the triangles are only strong enough if the quilt doesn't weigh too much.
 Aren't the shadows spectacular?!  

 Here's a closeup of one of the signature blocks.   I did the same thing for MY wedding. . . hopefully I will make mine by the time our 10th anniversary rolls around ;c)  

some more closeups. 


Thanks for stopping by!  
For all the latest photos please "like" my facebook page: Facebook.com/KatiesQuiltsAndCrafts

Friday, October 30, 2015

"I Love Lucy" Toddler Costume


I really enjoyed making Mira's costume this year.  
However, it was not without it's trials and headaches.
But we won two costume contests, and I live for praise and validation so I'm happy.  

The (almost) FINISHED DRESS!!!!  - simplicity pattern 3836 -
I added an "I Love Lucy" applique heart.
I did the embroidery with Wonderfil Spaghetti white thread and my free-motion foot.
(I later added some additional red accents I thought were needed)


The signature Lucy Dress!  Polka Dots with lapel collar and white apron. 


 This is the inspiration photo I found online.
I tried so hard to get Mira to wear a wig.  Unfortunately she was having NONE of it.  I tried many many MANYYY different ways to get her to have "red hair" without the itchy wig.
I settled on this weird headband deal.  
I took a wig from the halloween store and ripped out some of the stitches from the base.
This is actually made up of two "sections" of hair.   (There are probably about 15 sections in a wig.)
I cut the sections in half to make 4 "curls" - then I just used a bunch of hairspray and attached them to the headband with needle and thread.   (on the 2nd day of wear, I decided to pull out the hot glue gun FYI)  So I know it looks weird. . but hey, at least she is wearing it and it's comfortable! ;c) 


Here we are at the Mall trick-or-treat.   Out of 1,000's of kids.  She won the costume contest for her age group  (0-3) 


 And then we went trick-or-treating in our local town.
 Everywhere we went, there were smiles.  
 I love these photos, she must have just got a sucker  (that's her favorite!)  But it was freezing and windy tonight so she had to wear a sweater cardigan.  

Some of the trick-or-treat photos I captured before it got too cold and she had to put on her coat.  

 Here is the pattern I used for this dress -  simplicity pattern 3836 -  All relatively easy - with the exception of the Lapel Collar. . which was like the most complex word math problem in the history of the whole entire world.  I spent a good 24 hours just looking up tutorials and watching videos on this just to figure it out!!  
But that's why I like to do this each year.  So that I can have a new skill in my pocket.  
 And here is ME having way too much fun with the wig that I bought for Mira.  ;c) 
Here are the two 1st place awards we received.   YAY!  


and I thought I would share this adorable photo.   We went trick-or-treating before Daddy got home.  But he finally got home from work, and started down the street to meet us.   When Mira saw her Dad she rannnnn to him saying "Dadda" "Dadda" and then just wanted to sit down right in the middle of the street with him.   (they have a weird relationship, and I think they bond over candy and sugar) LOL


As always, for the most recent information please "like" my facebook page:
Facebook.com/KatiesQuiltsAndCrafts

Thursday, September 17, 2015

Vintage Baby Clothes


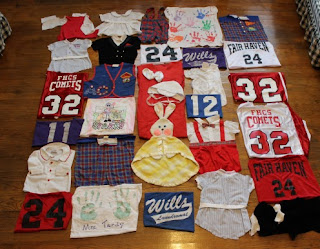
My cousin's son is in his 30s? now, and this quilt contains pieces from newborn to adult.  
 Here are all of the pieces on the floor.  Ready for graphing.    There are little baby Christmas outfits, jerseys, signed and painted T-shirts, boy scout vest, soft toys, booties, and bonnet.  
 Here is the quilt top pieced.   Since I couldn't adequately baste the quilt with the 3D elements, I added those later after the quilting.   
 Finished quilt with extra elements quilted/tacked down.   


 The back is a grey chevron.  
 

To order your own clothing quilt, send me a message on facebook or email with the subject line "Quilt"  


KatiesQuiltsAndCrafts@gmail.com
Facebook.com/KatiesQuiltsAndCrafts