Google Analytics

Showing posts with label memory quilt. Show all posts

Thursday, September 17, 2015

Vintage Baby Clothes


My cousin's son is in his 30s? now, and this quilt contains pieces from newborn to adult.  
 Here are all of the pieces on the floor.  Ready for graphing.    There are little baby Christmas outfits, jerseys, signed and painted T-shirts, boy scout vest, soft toys, booties, and bonnet.  
 Here is the quilt top pieced.   Since I couldn't adequately baste the quilt with the 3D elements, I added those later after the quilting.   
 Finished quilt with extra elements quilted/tacked down.   


 The back is a grey chevron.  
 

To order your own clothing quilt, send me a message on facebook or email with the subject line "Quilt"  


KatiesQuiltsAndCrafts@gmail.com
Facebook.com/KatiesQuiltsAndCrafts 


Thursday, March 12, 2015

Finished Graduation Memory Quilt

For several years now, I've been making these quilts for a NY private school
I cut up white fabric squares and mail them to the school.
The students then fill them out with signatures and drawings.  
All the kids are so creative and I love seeing what they come up with !
The photos below are closeups of all of the squares.


Monday, January 5, 2015

Memory Quilt from drawings


I've been making quilts for a Private School for several years now.  I SO enjoy making these.  
What we do is I send the cut squares to the school, and the students fill them out, based on a certain "theme" and then send them back to me to be made into a quilt. 

You can see past quilts here

Here is the completed top, and then the completed quilt. . quilted.  

These quilts are panels that will be added to the original quilt that was made - because extra students were added and they needed to be included in teh graduation ceremony.  


To order your own custom memory quilt - please send me an email at: KatiesQuiltsAndCrafts@gmail.com


Monday, October 6, 2014

Fun Baby Blanket REDO challenge!


My Mom's cousin Joyce asked if I could take her SON's baby blankets (from when he was a baby) and turn them into something NEW. ...
 SURE I said!  I will be happy to give it a shot!!  ;c)
He is getting married soon,  and Joyce gave this finished quilt to her son at his wedding shower.


The blankets have been washed many many times, stains, giant holes, weak and shredding fabric.  Also, the colors in the blankets don't exactly MATCH, so to say this was a challenge, would be an understatement.  . . a FUN challenge though!   Take a look at these 4 baby blankets and think . .what would YOU do ?  How would YOU fit them together?   How would you go about it?  
I am really happy with how this quilt turned out - and I feel that I breathed NEW LIFE into these blankets, and now they will last another 3 decades!  (at least!)


 I decided that I would make a RAG-style quilt.  
The troll doll blanket is actually a quilt.   The back of this blanket is a panel that is made up of large troll dolls.  The original quilt maker cut out the trolls from that fabric, and hand-appliqued them onto brightly colored solid background fabrics.  The hand applique is gorgeous!  She also hand-quilted the 3 layers.  I wanted this blanket to be the "star"  So I started with the troll blocks, and then worked around them.
I noticed that the polka dot blanket had similar colors.  So I made similar size blocks with that blanket.  I took the remaining two blankets and made 4-patch units.    And a large center block because Joyce's son loves elephants.
 I measured the troll blocks from the original quilt, and they varied in size, but averaged 7.5"
I typically want at least a 1" seam allowance for a rag quilt. . but I decided that for this quilt that I would do a 0.75" seam allowance and use a 6" finished block  (7.5" UNfinished).  
 HOWEVER, If I cut the blocks out exactly as they were in the original blanket, some of the trolls head and feet would be gobbled up by the seam allowance. So I utilized the blankets borders, and cut into the center blocks so that I could keep most of the troll in tact!    That's why you see more than one color in some of the troll blocks.
The back of the quilt is NOT so pretty ;c)  But you can see the awesome original troll doll fabric on the back. 

Here's a closeup of the center of the finished quilt.    This photo shows off the strong diagonal movement with the lights and darks.  
Side-by-Side of the blankets and the finished quilt.  

So...
What would YOU do??  
I would love to know!


2 Quilts made of baby clothes

If you would like a quilt made from your child's clothing, please email me or send me a message on facebook !
www.facebook.com/KatiesQuiltsandCrafts - KatiesQuiltsandCrafts@gmail.com  subject "quilt"
Contact me if you have any questions - detailed price list on facebook under "general info" -  additional photos of baby clothes quilts on facebook in the album titled "T-shirt/clothing quilts"


I accidentally deleted most of the photos of these quilts before blogging them.  But I DID find these few photos from facebook and flickr!

I really really enjoy making these quilts out of baby clothes.   Like T-shirt quilts, they are similar to putting together a jigsaw puzzle.  I lay out all the pieces on the floor, fuse the pieces, cut, and then fill in the gaps with alternating colors from the clothes.   This is the 3rd and 4th quilt I have made using baby clothes.   For these, I tried using more of the details from the clothing.  You can see in the closeups that I kept some of the stuffed toys in tact.   I also tried to keep embroidered details, buttons, pockets, etc.,  -  It's much more difficult doing it this way and most of the stuff has to be done by hand.  But I DO think it's worth it in the end.


I can use onesies, bibs, shirts, pants, jerseys soft hats, blankets and small stuffed toys.  And don't worry about holes or stains because before anything goes into the quilt, it's backed with stabilizer, and the finished quilt is quilted thoroughly so stains are hidden (or cut around.)


Thursday, May 1, 2014

Graduation Memory Quilt

I had the opportunity 2 years ago to be a part of this amazing project.  A private school principal had her students very artfully "draw" their signatures on white cotton fabric and I stitched it up into a quilt!  I just love the creativity the students have.   They are given a "theme" which is a verse from the bible.. . and students stick to that theme.   This year it was all about the stars and heavens.  
The background blue is their school shade of blue, and the kids wanted BRIGHT colors for accents so I use bright scrappy cornerstones!  I love the way these always turn out and hope I get to do more of them in the future.

Here are the white squares of fabric that I cut, and are ready to send off for the kids to "decorate." 
 After I receive the finished squares back from the mail, I pin them on the wall and arrange, rearrange, and arrange some more until I go crazy ;c)
 I got to fill out ONE square this year!!  I used the school name ;c)
 Here is the finished TOP before quilting
 and all the finished quilt photos!


Friday, August 10, 2012

4 Clothing Quilts


I recently reconnected with a friend I went to school with via facebook.  Elizabeth does quilling, makes jewelry, and the occasional quilt.  I also befriended her mother on facebook.  Elizabeth's Mom, Jacqueline, lost her Mother recently.  Jacqueline and Elizabeth saved a bunch of her clothing with the intention of having it made into a quilt.   Jacqueline separated the clothing by color into 4 stacks, and each stack would be made into a different quilt.  

I've made several T-shirt quilts, but never made a quilt out of just clothing.   To be honest, a year ago, I probably wouldn't have felt confident enough to make a quilt out of clothing.   Working with a variety of different fabrics raises the difficulty level significantly.  Some fabrics are stretchy, some are very thin, and some fray like crazy.  Using a lightweight fusible stablizer on some of the stretchy and thin fabrics helped a great deal.  All-in-all I think they turned out quite well.  I gained alot of confidence with these quilts and look forward to working with clothing again. 
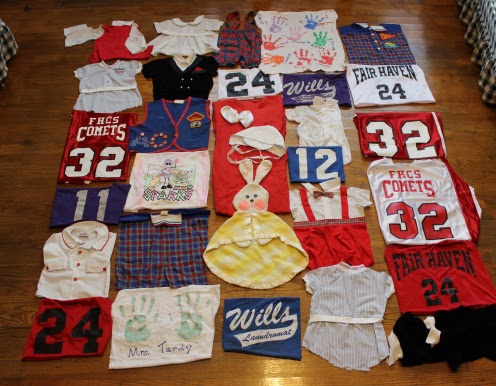
These are the stacks of clothing, after I had removed all of the seams, and unusable stuff.  

I started with the blue fabrics first.  Since there were more of them than the others, I choose the blues to use for the Log Cabin quilt.   This is a combination of log cabin blocks and pocket blocks.  (Pockets from the clothing) This is actually the first time I have made a log cabin quilt.  Strips are 1.5" finished. 


Next quilt I started on was the purples.  Here are all of my squares, with drawn stitching lines for HSTs.  

and here are all my HSTs, pressed and ready to be sewn. =cD

The finished top.  

I used the "Trail to Treadlonia" block for the greens.  Since there were not a whole lot of green fabrics, I used a white background fabric for this quilt.  

Here are all my TTT blocks trimmed, and a pile of trimmings. ;c) 

TTT blocks hanging on the wall.  I was thinking about adding the pockets to this one, but it didn't look quite right. 

For the red group, I kept it simple.  Just some simple 3" finished squares and pockets.  

Here are all my quilt tops, and backings.  The backings are all homespuns. 

 Closeup shot of the quilting on the green quilt.  For the Green and Red Quilt I used this super thick batting.  It was very hard on my back and shoulders, but it really turned out good I think.
 Quilting on the Red quilt.
Quilting on the Blue Quilt

Quilting on the Purple Quilt


Finished Purple Quilt

Finished Red Quilt

Finished Blue Quilt

Finished Green Quilt