I know they make some stereotypical references of what a quilter should be or what a quilter should look like, but it's still humorous. Check it out ;c)

Wednesday, July 27, 2011
The first rule of quilting.....
This is an adorable little post that was done by the Onion. It's a "fight club" reference. So if you haven't seen or don't know of that movie, you might not "get it." ;c)
My string blocks have arrived!
YAY! So exciting! They're all sooo beautiful. I get my mail at my mother's house because I don't have a physical address at my apt. So the strings that I stitched are in a separate photo. Check them out. . aren't they awesome????


And here are my string blocks before I sent them out:

I still have quite a few of my neutral string blocks left from my UFO'd Roll Roll Cotton Boll. I'm sorry . . . yes, I gave up on it. I hang my head in shame. =c(
So I'm planning on using the Neutral string blocks along with these Colored ones from the swap. Wouldn't that make a cool quilt? Here's my neutral strings hanging on design wall:

~~~~~~~~~~~~~~~~~~~~~~~~~~~~~~~~~~~~~~~~~~~~~~
Also, I just finished a little project I am quite proud of. My mother, just got a new Macintosh computer. It's so cute!! But so complicated when she's spent the last 40 years perfecting her use of PC. I couldn't imagine going from PC to Mac. . . I doubt I could go very far. I might start small, like she did. . and get an iphone.
So the Mac came in this elaborate shipping box and LOTS of padding, but NO case for it! I took it upon myself to make her a little laptop carrier. I used THIS TUTORIAL from "sew mama sew."
The tutorial is actually for a plain laptop SLEEVE. But I altered it a bit, made it a QUILTED laptop carrier, complete with strap. If anyone would like a tutorial on this I would be happy to make one. It has no pockets even though I would have liked to have added some. I found that with these bags you can EITHER do quilting, OR add pockets. One or the other NOT both.
I asked my mom what colors she would like and LUCKY FOR ME she said black/white/maybe some red. WELLL I am currently working on a Red/White/Black quilt so I already had the fabric scraps ready to go! You can see my RED/WHITE/BLACK work-in-progress quilt HERE.
I was quite torn as to what to use for the lining. I kind of wanted something soft, or fuzzy. I went through my scraps of fleece, flannel, and fuzzies, and couldn't find anything to match. But then I remembered my Michael Miller KNIT black polka dot fabric that I used to make my friend Heather's dress ;c) I was kinda scared to use a knit for the lining, but I just added some Pellon fusible stablizer and I think it worked quite nicely. Here's some photos of the finished bag:


Oh and here's the dress I made for Heather using the same knit fabric by Michael Miller ;c)

Tuesday, July 19, 2011
Next Project - Spa Quads

Okay so yes, I do have several UFOs and MANY WIPs hanging in the back, but I want to start something NEWWWWWWWW.
Oh brother, I know.
Well, I just have the urge and I can't help myself! LOL
I have several black and red print Fat Quarters that I purchased at the IQF Cincinnati. They're calling my name I tell you!!!
SO! I have spent the last couple days pondering what to do with these fat quarters. . I originally thought about designing something myself, but I'm feeling kinda lazy right now. I'd rather just use someone else's pattern and then add my touch of sparkle with the quilting! So I choose a design that would let the quilting shine through. This pattern looks like it would finish rather quickly too. . .so less time piecing and more time quilting. Always a plus in my book!
If anyone would like to give this pattern a GO, CLICK HERE to go to the pattern from Windham Fabrics. All you need is 24 fat quarters. I have exactly 24 FQs of Black, White, and Red prints!! It's meant to be?! ;cP

So here's all my pretty fabrics I am going to use for the quilt. The top 3 fabrics will be borders... *maybe* lol
I would also just like to add that I very rarely PRINT anything. I'm very cheap ahem, I mean Frugal, so I like to save all the paper and ink I can in my quilting process.
Here I just wrote down the general idea of the quilt on a half sheet of paper. This is the basics and I should'nt have to pull the pattern .pdf back up.


Okay I'm going to get sewing! What's everyone else working on right now?? ;c)
UPDATED 7/7/2011 -
A have all my blocks done, but that will be another post - here's a photo of the 1st block completed:

***Updated 7.29.2011****
Finished all my blocks - Now I'm just trying to find a way to arrange them in a pleasing manner.

Sunday, July 17, 2011
How-To Flickr Slideshow
I had a really hard time figuring out how to add a flickr Slideshow to my blog. Once I figured out how to do it, I realized I was trying to make it much more difficult than it really is.


10. If you would like to include the code in a Blog Post, Copy-Paste the code here.
If anyone out there is curious as to how to embed a slideshow from flickr onto your blog I will try to explain it here.
1. Go to Flickr and open and account if you haven't already done that.
2. Choose "upload" and upload any and all photos you wish to include in your slideshow.
3. Once the photos have been uploaded you have the option to add a description and tags. . go ahead and do that now.
4. While you are still on that same screen - at the top right hand corner there will be an option to "add to set" or "create new set." You will want to create a NEW set. Choose a name and description for your set and save.
5. Once you have saved, go BACK to the flickr homescreen. (Just click on FLICKR logo.)
6. Click on the link that says "YOUR PHOTOSTREAM" now all of your photos will show up to the left, and your SETS will show up on the right hand column of the screen.
7. Click on the set that you just created. Your set will show up and in the top right hand corner there will be an option to VIEW SLIDESHOW.

8. Choose the VIEW SLIDESHOW option and then you will get this screen:
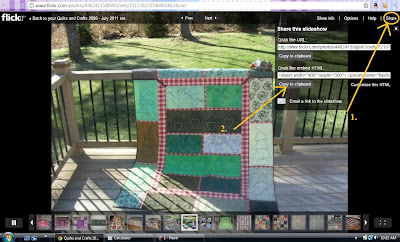
9. At the top right hand corner there will be an option to "SHARE"

9. At the top right hand corner there will be an option to "SHARE"
Click on "SHARE" and then click the 2nd code that will give you the HTML "embed" option.
Copy to your clipboard and then go to your blogger screen.

10. If you would like to include the code in a Blog Post, Copy-Paste the code here.
Now you have you can preview your Slideshow, and Publish your Post! ;c)
This is a slideshow I just made that includes all of the quilts and things I have created since 2006.
You can also add a slideshow to your blog by adding a GADGET.
Go to your DASHBOARD and click ADD GADGET.
Choose the HTML option. Enter the embed/HTML code from flickr and then save.
Now the slideshow will be on your sidebar of your blog for everyone to see.
Saturday, July 16, 2011
I am a FMQaholic.
I recently was awarded the "FAN OF THE MONTH" from Wonderfil's Fan of the Month Contest. I was only the 2nd winner of this contest and I think it's mainly because not many people are aware of the contest. The WINNER gets a fabulous thread package from Wonderfil.

Go here to check out the rules and to find out how to enter the contest: http://www.facebook.com/wonderfil
I received my thread package/winnings in the mail this week. It didn't take hardly ANY time to arrive! Well I opened the package and . . . . started drooling. ;c)
So many beautiful threads to try! As a matter of fact, they include one large spool of each type of thread they offer. Lots of Cotton, Rayon, Metalic and variegated threads.
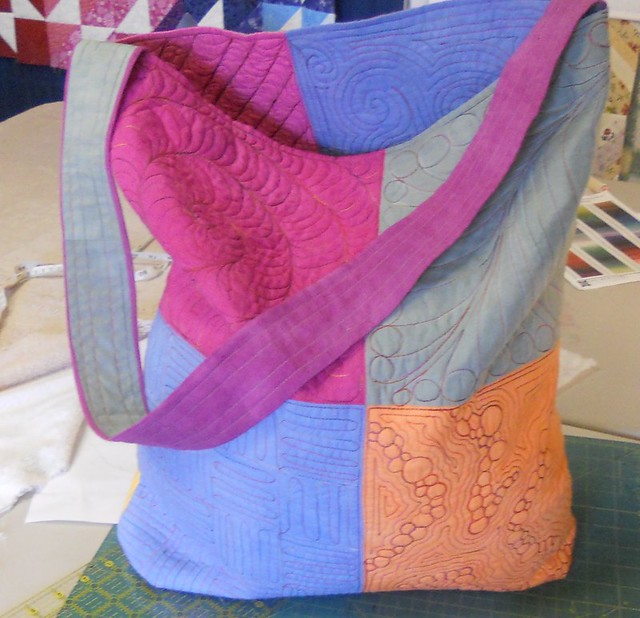
The threads along with my friend Tiffany having a birthday inspired me to start a new project. I started thinking about what I could make for Miss tiffany. I just finished making another friend of ours pot holders and didn't want to do that again. I decided to go with a TOTE, but not just any tote. I decided to make a FMQ'd TOTE!!!
I still have almost all of the fabric left from my last batch of hand-dyes. Since the dyes didn't turn out very bright, they made the perfect backdrop for some FMQ practice/playing.
I went to http://freemotionquilting.blogspot.com/ for inspiration.... AS ALWAYS, thank you SO much Leah Day for all your hard work. Here's some photos of my finished project, and I'll show you which FMQ filler design I used and give you a link to it. Isn't that nice of me? ;cD
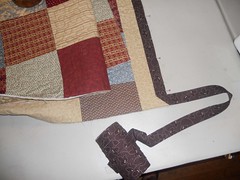
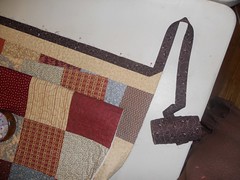
So here's the tote, I sandwiched the pieces together and used variegated thread to quilt them.
I just used some cheap polyester batting for the center, the bottom is squared off so it will be flat. It's a little TALLER than I originally anticipated but that's okay. I see it as a nice beach bag or something. And the Strap is long, so she can throw it over her shoulder if need-be.
***Click on any of the photos to make them larger if you wish.****
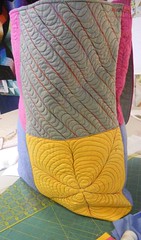
Okay for the top design (pink) I used Leah's pattern "GIANT SNAIL"
The bottom design (blue) I used her pattern: "CHECKERBOARD"
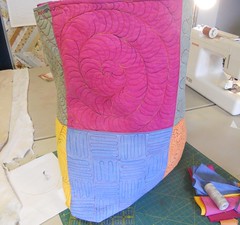
The top pattern (green) I used the design "BUTTERFLY FEATHER FLOWER"
For the bottom pattern (orange) I used "PEBBLE MAZE"
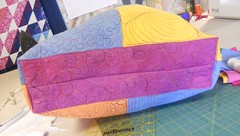
For the TOP design on this one (Pink) I used "OCEAN CURRENT"
For the bottom part (blue) I used a simple "STIPPLE" ~ This is the first block I quilted and I wasn't sure what I was going to do . . . you can't go wrong with stippling ;c)
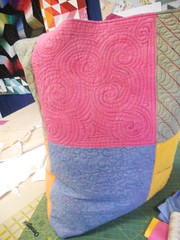
Okay for the top part of this one (green) I sort of used my own little pattern here. I had originally planned on just quilting straight lines and ending it at that. BUT, after I quilted half the lines I realized that plain lines weren't going to satisfy me. So I did a variation of the Giant Snail pattern from above. These "C" or Banana shapes are what you use to fill in your squigglys when you're doing McTavishing. They're one of my favorite shapes to play with when FMQing because there's JUST ENOUGH thread play.. Also, the shape really works nicely with your batting adding SO MUCH texture to your finished quilt! If you've never tried this type of quilting pattern before I HIGHLY recommend it. Feel free to try what I did. First quilt just straight or diagonal lines . . . they don't even have to be evenly spaced. Then just go back and forth making "C" shapes. It's a beautiful look to the finished quilt.
BUT I DIGRESS ;c) for the bottom part of the above photo (yellow) I used Leah's design "SUPER DAISY" ~ This one was my husband's favorite and it was much easier than I originally had anticipated. I can't speak highly enough of Leah and her website. She is SO generous for showing us so many amazing quilting patterns. It's so nice when you're stuck in a spot and lacking ideas. . you can just go to her website and all the photos are all laid out for you and you can just go through and pick the one that you like. She even gives you a VIDEO explaining in detail how to quilt EACH ONE!!! She's done so much for the FMQ world!!!
And finally for the bottom:
I used Leah's paisley design called "MUSSEL SHELL"
So the next time you want to make a tote. . . why not JAZZ it up a little and use some FUN Free-motion designs!!! It makes a beautiful, SOFT tote that's completely washable!
If you make one, please send me a pic!! KRATI@AOL.COM
I would love to feature the photo here on this blog!
Wednesday, July 13, 2011
Contest ~ BumbleBeeBead
I have joined forces with the lovely Mrs Jonua Besnard to host a giveaway. 


Jonua's BIO:
Me. I am from West Virginia in the United States. I grew up in a very small town and went to the same school as Katie. After graduation I started college and left halfway through. I had no idea what I wanted to do with my life. I ended up moving around a bit and had the chance to live in NYC for six months! After I moved back I settled into a job and a year later I went back to school to finish my degree. I ended up with a degree in Geography. I did a short study abroad and met my husband Florian. We had been penpals for five years, and immediately after meeting we were dating, and in less than one year we were married! I moved to Paris and started to learn a whole new language and culture. It was scary at first because I did not know what I would do for work, so I started playing around with jewelry. Over one year later here I am starting a new business and feeling more passionate about this than any other job I have ever done in my life!
Here's the idea straight from her blog:
Contest Encore!
I said I would post on the November contest, but I have turned it into a NOW contest!
It will run through the end of August. Basically it is very simple.
The point of the game is to see how many people you can get to fan mine, and Katie Wiseman's Facebook fan page. You must tell people, when they LIKE thetwo pages to leave a comment that you sent them, so we will know once we count them at the end of August. The winner with the most referrals wins!
J. Rachel Besnard Design's Facebook Fan Page
Katie's Quilts and Crafts Facebook Fan Page
Again, the good part. The prize. Katie Wiseman will be giving away one of her handmade reversible tote bags. It is simply gorgeous. Katie does very thorough and intricate work. I will be giving away a $30 gift card to my store,J. Rachel Besnard Designs.


We will announce the winner on September 1st. Good luck!!!
Me. I am from West Virginia in the United States. I grew up in a very small town and went to the same school as Katie. After graduation I started college and left halfway through. I had no idea what I wanted to do with my life. I ended up moving around a bit and had the chance to live in NYC for six months! After I moved back I settled into a job and a year later I went back to school to finish my degree. I ended up with a degree in Geography. I did a short study abroad and met my husband Florian. We had been penpals for five years, and immediately after meeting we were dating, and in less than one year we were married! I moved to Paris and started to learn a whole new language and culture. It was scary at first because I did not know what I would do for work, so I started playing around with jewelry. Over one year later here I am starting a new business and feeling more passionate about this than any other job I have ever done in my life!
Make sure to take a moment and stop by her blog
http://bumblebeebead.blogspot.com/Thursday, July 7, 2011
Almost THERE and Wonderfil Win
I am finishing up the binding on Jaime's BIG BED quilt. . WHICH I will be using as a QAYG tutorial. The tutorial, as a matter of fact, is almost finished as well! I am SO excited. I have worked VERY hard on this tutorial. I have tried my best to explain in detail the method in which I do quilt-as-you-go. I should have the tute up tomorrow . . . if all goes as planned ;c)
Next item on the agenda I wanted to discuss. . lol:
The WONDERFIL FAN OF THE MONTH CONTEST
This is the 2nd month Wonderfil has hosted the contest, and the winner gets a thread package!! I love love love love love Wonderfil. . . their thread is amazing . . . but what's even more amazing is their customer service. They're also very interactive with their fans/customers on their facebook page: http://www.facebook.com/wonderfil?ref=ts
If you're a fan of Wonderfil threads i.e., Invisifil, Tutti, Spagetti, etc., GO NOW to their facebook page. Go to the tab titled "Fan of the Month" You can see a dorky photo of me (lol) and read how you can enter the contest and win a thread package!!!
Okay. . stay tuned and good luck!!!
Wednesday, July 6, 2011
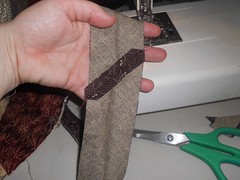
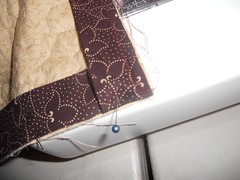
*PART 5 - Finishing the Quilt*
You're almost there!!! You should now have something that looks like a quilt! Congratulations!

All that's left is binding!
If you want to add a label, now would be a good time to start thinking about that.
A quilting sleeve? Now would be a great time to add that too~!
Your binding is already made, so now all you have to do is add it.
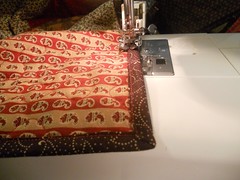
I told you this quilt was made totally by machine . .and the binding is no exception. You are going to be adding the binding in a manner that is very similar to the way you did the sashing.
Part A ~ Attaching the Binding to the Back.
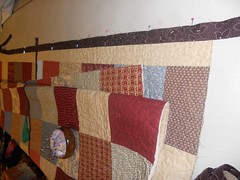
Turn the quilt over so the BACK is facing you. We will first be sewing the binding on to the BACK side of the quilt.
1. Start in the center of one side of the quilt. Leave a tail of about a foot, and start pinning the sashing down.
2. Pin until you get to the first corner.
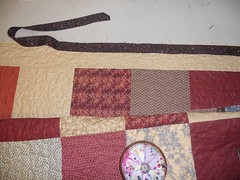
Fortunately, I got lucky and did not run into the problem of a seam landing in one of the corners. You do NOT want a seam on one of the 4 corners of your quilt. If a seam happens to land on one of the corners, you will have to readjust the binding. Un-pin, Adjust, and RE-pin until you have seamless corners.
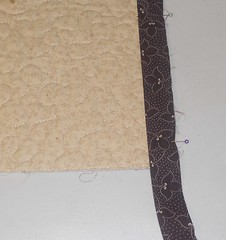
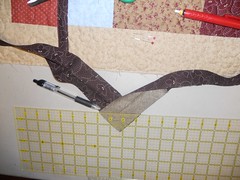
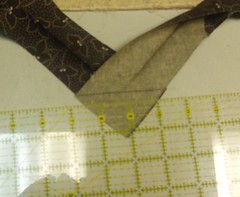
3. Pin about an inch away from the edge, and then fold the binding away from the quilt, perpendicularly. (click on photos to enlarge) Pin in place, diagonally from the corner.
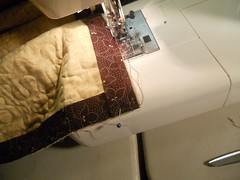
4. Fold the binding back down, and pin in place.
5. Continue pinning until you get to the tail end of the binding.
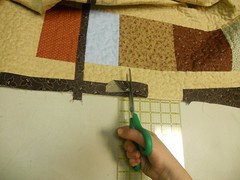
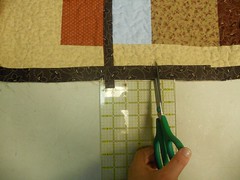
6. At this point you should move this side of the quilt onto a cutting mat or wide ruler. With scissors, trim off the diagonal edge of one side of the binding so it is straight.
7. Line up the cut edge of the binding with one of the inch marks on your ruler/grid and pin in place (close to the edge.) Use a large pin so you can see it.
8. Lay the opposite edge of the binding over top of this piece. We cut our binding at 2.25" so there should be 2.25" overlapping. Pin the opposite edge down, and cut at the 2.25" mark with scissors.
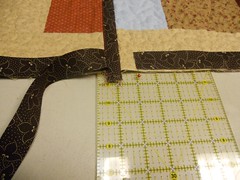
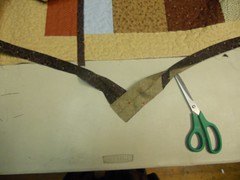
9. Remove the pins that are to the left and to the right of your cut pieces. You will need a little "give" for the next step. =c)
10. With Right Sides Together, Pin your binding strips together on the diagonal. The reason I ask you to FIRST pin them on the diagonal is because we are going to TEST to make sure the strips aren't twisted, and we have them going in the correct direction. So now that they're pinned, go ahead and "pretend" it's already sewn, and lay it next to your quilt to ensure that it's correct.
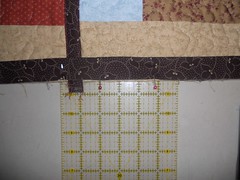
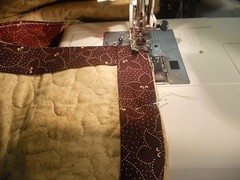
11. Now that you know everything's correct, take a ruler, and draw on your diagonal sewing line with a pen, pencil, chalk or whatever.
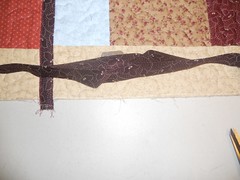
12. Pin in place.
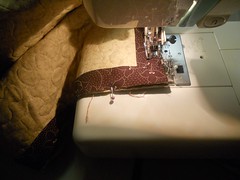
13. Lower your stitch length a bit, and then stitch in place.
14. Trim your seams, and Finger-Press your seams open. (You can press these seams open with an iron if you wish, but I never do.)
15. Fold your now sewn seam back in half and finger press. Pin the rest of the binding to your quilt back.
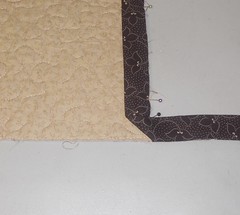
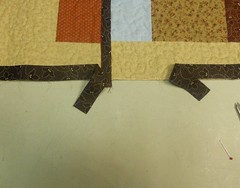
16. Stitch 3/8" seam all the way around, stopping at corners.
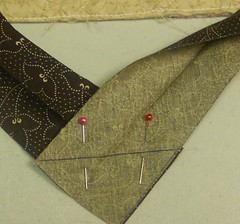
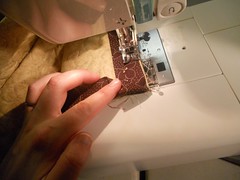
17. Once you get to a corner, stop, fold your binding away and pin on the diagonal. Make sure to pin right before your folded binding. (see photos)
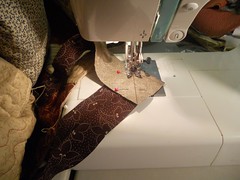
18. Stitch until you get to the pin. Remove Pin, and then Stitch diagonally to the corner.
19. Remove the quilt from the machine, and fold the excess binding back up and place the quilt back under the presser foot. Begin stitching over the folded binding 3/8" away. Continue stitching and repeat at each corner until you're finished.
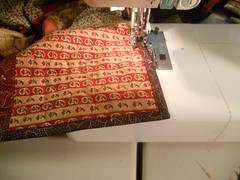
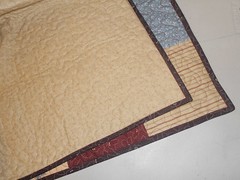
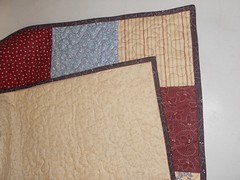
Part B ~ Finishing Binding.
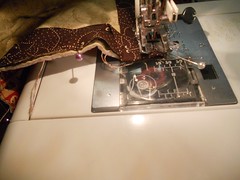
Flip the Quilt over so the TOP is facing you.
1. Gently pull the binding from the back to the front and finger press in place. The binding should just cover the stitching line you just stitched.
Keep scissors near by - remove straggly strings as you go.
2. Pin in place. I use either Pins or plastic-coated paper clips for this step. When you get to a corner, make sure you fold a nice pretty mitered corner and pin in place. This will make it much easier for you when you are stitching. 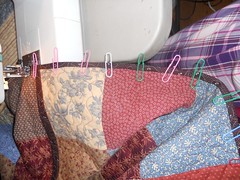
3. Begin stitching a straight stitch approximately 1/8" from the folded edge. The stitching should just blend into the quilt.
4. Once you have stitched once around the complete quilt, I recommend doing a 2nd stitching line as well. When stitching the 2nd line of stitches, quilt as close to the folded edge as possible. This step will go MUCH faster since you don't have to remove any pins. ;c)
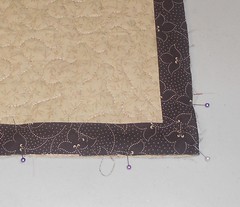
Your quilt binding/corners should look similar to this:
Once you're done with the binding, give your quilt a nice pressing with steam or water. Pay close attention to the sashing and remove any straggly or stray strings as you go.
If you wish, wash and dry your quilt. Once you're finished, make sure you take a photo and name your quilt. I would LOVE to post a photo of your quilt here!!
If you have ANY questions, leave them in the comments section and I will respond to them ASAP.
Subscribe to:
Posts (Atom)